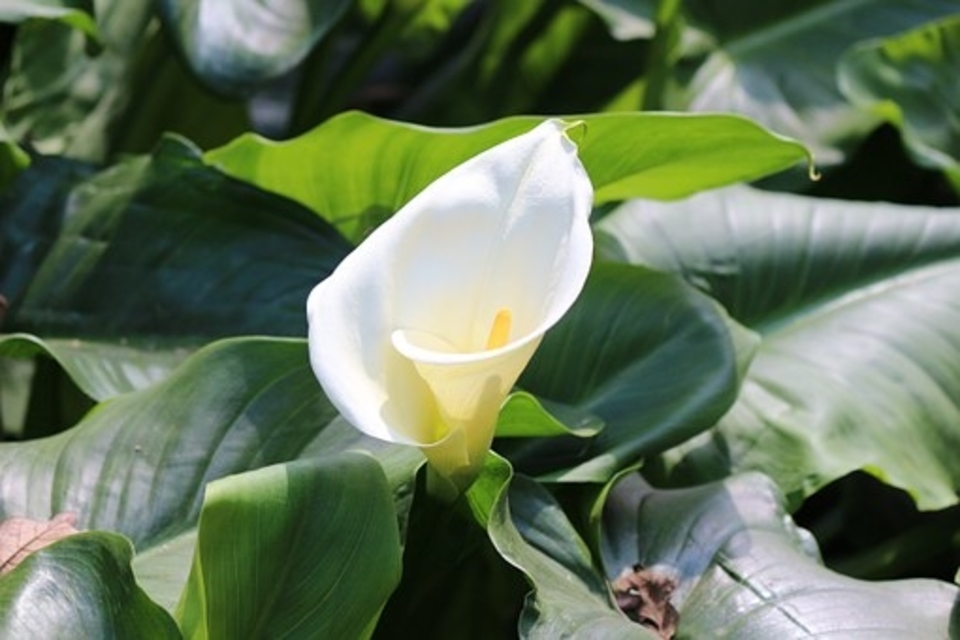
The calla lilies are known for their famous chalice-shaped flowers that have a variety of striking colors. Gardeners growing this magnificent plant testify of the less care the calla requires for it to thrive. But the less maintenance shouldn’t blind you to overlook the correct and straightforward routine recommended to keep the calla healthy.
Once you start to notice, your calla lily drooping and wilting, be sure there’s a problem. As a gardener, you have to be concerned and get to the root of the problem to apply a solution.
So what would make a calla lily droop? Find out more in this article.
Causes of a Drooping Calla Lily
Count yourself lucky if you can experience the joy of the beautiful sword-shaped leaves and the cupped blossoms. A sag or wilt in the calla lily is quite alarming and deserves prompt action to resolve it. However, to resolve the issue, you need first to figure it out. The following are some of the apparent reasons causing the hang.
- Excess nitrogen in the fertilizer
- Over-watering and under-watering
- Pests and diseases
- Temperature changes
Read on as we explain the above causes and the solutions given to the problems.
1. Excess Nitrogen in the Fertilizer
Even though feeding your calla lily is essential to maintain robust growth, excess fertilizer deems harmful to the entire plant. Fertilizer with high levels of nitrogen is unsafe for the general health of the calla lily.
Immoderate nitrogen will cause the plant to produce more leaves and fewer blossoms. The excess leaves will cause the calla lily to start drooping. As the plant feeds on the excess nitrogen provided in the soil, discoloration will begin from the roots up. All this time, the plant weakens more causing wilting and drooping of the calla lily.
How to fix: Do not use high-level nitrogen fertilizer since it will only increase foliage growth but reduce flowers. Calla lilies are heavy water drinkers requiring a large quantity of the right kind of nutrients for magnificent blooms and general healthy growth.
After preserving your rhizomes during the winter season, you are set re-plant them in spring. Prepare a well-draining garden bed or plant them in a container with the correct potting mix. Add in well-cured manure to the soil to begin a balanced feeding procedure. You can also feed the tuber twice weekly with a mixture of diluted fish to stimulate growth.
2. Over-Watering and Under-Watering
Like most plants, watering your plant too often and less often will most likely cause problems. The vigor and general health of the plant will be affected. Drooping foliage of a calla lily plant is a sure sign of over-watering and under-watering.
If your plant is over-watered and continually sitting on soggy soil, it will suffocate, and root rot will set in. Conversely, In case the calla lily is under-watered, moisture issues may cause the drooping. This means that the plant is not receiving adequate moisture to make it strong and upright.
How to fix it: If the soil feels dry to touch, the plant is thirsty. Adequately water the plant, and after approximately an hour, the calla lily should perk up again. Also, various reasons can cause under-watering problems.
For instance, the type of soil and the climatic conditions matter. Make sure your calla lily is growing on a fertile, organic, and well-draining soil that retains moisture for some time before the next scheduled watering session.
Plus, consider the climatic conditions of growing the calla lily. If it’s often left under direct sunlight for long hours, the soil’s moisture will quickly dry up, causing the plant to dry up and droop. Keep the calla lily under partial shade and away from direct sun.
How to fix
Conversely, if the soil feels soggy to touch, then your calla lily is over-watered. In such cases, avoid watering to give the plant room to absorb the water already available. Also, use a well-draining container to grow your calla lily. A well-draining container will draw out excess water.
However, if the bulbs or the stems of your calla lily have become soft and mushy, root rot has taken place. Sadly, the rest of the plant will turn to mush in just a short while. Therefore, it would be ideal for disposing of the entire plant together with the soil and start afresh if this happens. Disposing the ground is essential because it was already contaminated with the root rot; hence it can spread the infection to other plants if you plan to use it.
3. Pests and Diseases
After addressing the watering issues and your calla lily don’t perk up, you may face fungal or pest problems. If the base of the call leaves has strange spots or streaks, then you have pests or insect problems to deal with.
The common pests are aphids and can infect your lovely calla lilies with viruses causing white or yellow spots and streaks. They slurp on the calla lilies’ juices weakening the plants hence causing droop.
Equally, cold and wet conditions can bring about fungal infections to the calla plant. The fungus and bacterial infection will cause root rot, which will affect the calla’s foliage and blooms. Such fungal infections are gray mold, blight, and powdery mildew.
Subject to the pathogen, your calla will suffer from soft root, root rot, pythium rot, or crown rot. Though, all rot cases are frequent in circumstances where the soil is warm and often water-logged. These pathogens will gradually eat away at your calla roots until they wither and die.
How to fix it: When you spot any signs of pests and diseases, discard the whole plant and start over. Once the calla lily is infected with pests or diseases, then the only ideal solution is to get another calla lily and plant afresh.
Since the soil is also infected, be sure to get fresh and well-treated ground before growing another calla plant. Spray the entire area with pesticides to kill the aphids, so they do not land on the new calla lily. If the calla lily was growing near other plants, check if the infection has spread to them as well. If addressed early, you may be able to save the neighboring plants.
4. Temperature Changes
Leave alone the natural changing seasons, but the sudden changes in temperatures will contribute to droopy calla lilies. This refers to moving the potted calla lilies indoors or outdoors. The transition from the temperature it was used to will stress the plant causing it to wilt or droop.
How to fix it: if you notice the calla drooping or wilting after a sudden temperature change, do not take it back as this will confuse and stress it even more. Allow the calla to get used to the new environment, and then you will see it bounce back upright.
During the winter season, have the calla lily taken indoors to avoid frost. Calla lilies are not frost resistant. Thus, even the least amount of it will cause it to wilt and die eventually. Dig the rhizomes up, dry them and later store wrapped in newspaper in a cold, dry place. After winter and the frost disappeared, make sure the ground is warm again before re-planting the environment’s bulbs.
You can also allow the calla lily to reach its dormancy and naturally die back. Deadhead the wilted flowers and cut down the plant to ground level. It will shoot back up in spring.
Calla Lily Care Tips
- Since calla lilies can seem choosy about their temperatures, the ideal growing conditions are not hotter than 65°F and not colder than 55°F. If your home is sweltering, mulch the bulb to keep it cool in its pot.
- The calla requires plenty of bright sunlight in off-peak hours of the day. Please place it in an east or west-facing sunny window for best results.
- Calla lily loves water; therefore, always maintain the soil moist. But never allow water to stagnate in the container. Excess water will cause the tuber to rot.
- Standard well-drained potting soil is the right combination for the calla. Avoid potting soils with an uneven pH or excess fertilizer mixed in.
- Believe it or not, but the Calla Lily usually doesn’t need fertilizer. But if you wish for better growth, use a fertilizer with no ammonium and balanced nitrogen levels. Pro-longed fertilization will harm the plant.
- Calla adapts to re-potting well. Dig up the entire plant and re-plant the bulb with the sprouts upwards about 3″ deep in the soil. Only water once until new growth is visible before watering again.
Conclusion
Drooping and wilting calla lilies are sure to occur. When this happens, don’t feel discouraged and tag yourself as a lame gardener. Instead, trace the problem to provide the solution. However, bear in mind some solutions call for an absolute start over. These will happen only in extreme cases where the soil and plant are infected with diseases and pests. After all, every day is a learning experience!
More articles on calla lilies
Are Calla Lilies Annual or Perennial? [When Potted or in Outdoor Gardens]
Calla Lily Care after Blooming + How to make Calla Lilies Bloom

FELC...
$69.40 (as of June 29, 2025 10:16 GMT +00:00 - More infoProduct prices and availability are accurate as of the date/time indicated and are subject to change. Any price and availability information displayed on [relevant Amazon Site(s), as applicable] at the time of purchase will apply to the purchase of this product.)
Chap...
$15.49 (as of June 29, 2025 10:15 GMT +00:00 - More infoProduct prices and availability are accurate as of the date/time indicated and are subject to change. Any price and availability information displayed on [relevant Amazon Site(s), as applicable] at the time of purchase will apply to the purchase of this product.)
Gram...
$39.99 (as of June 29, 2025 10:15 GMT +00:00 - More infoProduct prices and availability are accurate as of the date/time indicated and are subject to change. Any price and availability information displayed on [relevant Amazon Site(s), as applicable] at the time of purchase will apply to the purchase of this product.)
AUTO...
$8.99 (as of June 29, 2025 10:15 GMT +00:00 - More infoProduct prices and availability are accurate as of the date/time indicated and are subject to change. Any price and availability information displayed on [relevant Amazon Site(s), as applicable] at the time of purchase will apply to the purchase of this product.)